Announcement

Collapse
No announcement yet.

Home Automation fits and starts - mostly success...

Collapse
X
 
  • Filter
  • Time
  • Show
Clear All
new posts

    Home Automation fits and starts - mostly success...

    This will be a rather long series of posts. I am new to HomeSeer specifically and to Home Automation in general. I thought I would post it in General Discussion, but since a lot of it pertains to HS3, I’ll put it here.

    PART 1:

    I started learning about 70 days ago, installing a trial version of HS2 and quickly migrating to HS3 by the end of January. I felt like it would be a double learning curve to start with the older version. My brother has a great deal of experience with HomeSeer, so I relied upon his help to get me started. Like many users here I have had quite a bit of trouble getting up to speed. These troubles are mostly learning curve, but compounded slightly by the evolution of HS3, mostly the maturation of the Z-Wave plug-in. Like most software development it seems like two steps forward followed by one step back. Overall I give the HS team high marks for their continuing effort as the product is clearly better than the first version I loaded in January.

    I have asked many (possibly inane) questions to this board and to my brother, but I am getting closer to understanding the nuances of the HS software and the Z-Wave network. Many thanks to The HomeSeer folks, my brother and many on this board. I have a long way to go, but I am getting there.

    The primary goal of diving in was the “geek factor” as I am sure many of you are guilty. I did have some secondary goals of automating some tasks and most especially reducing our energy usage. I was realistic enough to understand that I would spend more on this approach than I would recover in energy savings, but I still wanted to pursue that goal. Last year I had installed a TED5000 with 4 transmitter modules. That was great at providing me a big picture of electric energy usage, but simply was not a granular as I wanted to really chase some of the smaller “vampire” loads.

    Since HS3 supported the Brultech GEM through a plug-in from UltraJones, the first move I made was to that device from the TED. It allowed me to see every circuit in the house and make some changes in devices. We reduced our normal consumption by about 300 watts, so that we are at about an average of 650-watts when the house is more or less dormant. While that is still a lot, it is a vast improvement from the ~950 we were consuming before. This has been due to a replacement refrigerator, changes in the servers (HA, CCTV and Media), swaps to LED lighting for the devices that see more or less constant usage at night and isolation of about 100-watts of vampire loads from items that were only in use on occasion. We found that our two LG MiniSplit air conditioners consumed 30-50-watts each, even when they were off in the winter. They both went on Intermatic contactors to shut them down completely, unless it is warm enough for them to be used. Though they are heat pumps, we find that it is frequently too cold to use them for heat. We rely on a natural gas fired boiler hydronic system for heat. More about that in the next installment. There are a few other items that are now controlled by automation based upon time of day or outside temperature that also have dropped our total average consumption.. All totaled we have a net average reduction of 500-600 watts per hour. At about $.10 per KWH that will net a savings of over $500 per year. I’m sure I could have found the loads without the granularity of the Brultech GEM, but it was certainly easier with all of the data to instantly show what and where our consumption was. UltraJones UltraECM3 plug-in is a great value and a bargain at $39.95. The Brultech GEM is available from http://www.brultech.com. The prices vary based upon the configuration and communication methods. I chose wired Ethernet for my installation.

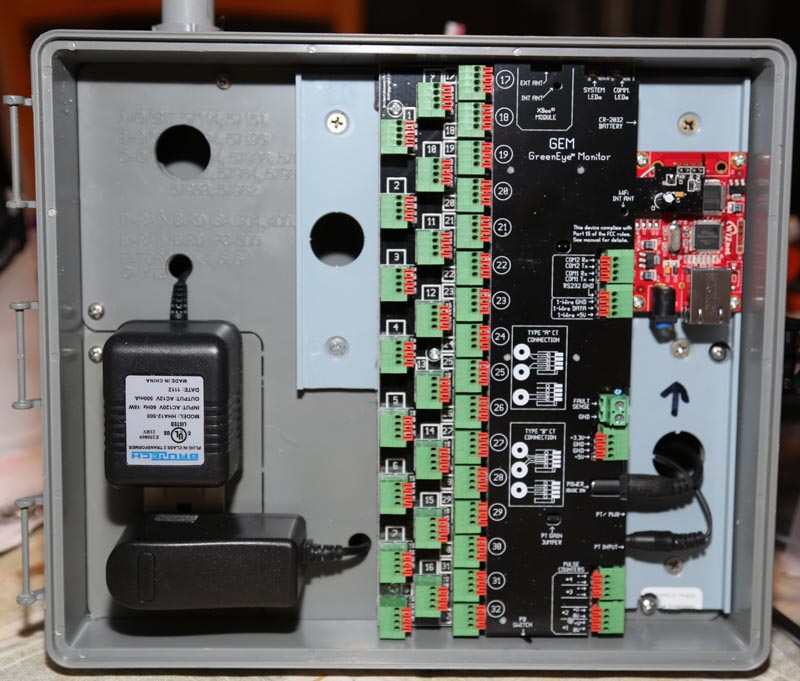
    The GEM uses current transformers to measure the load carried by each circuit. Each transformer is inductively coupled to a single lead and converts current into voltage (or current, depending on the style). The output of each CT feeds one of 32 inputs on the GEM. A 120-volt circuit requires 1 CT, a 240-volt circuit with a balanced load can use one CT. If the circuit feeds an unbalanced load such as a sub-panel or devices that may present a different load to one phase of the 240-volt service than the other, two CTs are required. For consistency, I used two CTs for every 240-volt circuit. For these circuits the two CTs are wired out of phase to a single input of the GEM. The Range, Air Conditioners and Dryer are likely to be devices that only present a balanced 240-volt load, so it is unnecessary on these devices. The service entrance, breaker panel and generator transfer switch are all outside on the back of our house. The GEM comes in a case designed for indoor use, so I needed to come up with a solution. One would be to extend the leads on the current transformers by CAT5 cable and locate the GEM indoors. The problem with that is that the service entrance and panels are on the master bedroom wall and below that is a finished basement. That would mean burying the GEM behind a suspended ceiling or very long extensions on all 40 pairs of CT leads. I wasn’t sure how length would affect accuracy, so I elected to mount the GEM outside. I found a nice watertight enclosure to mount the GEM circuit board in. It also had a GFCI protected duplex outlet inside the box. It was not large enough to accommodate the GEM’s full enclosure, but it was large enough to handle the GEM PCB. A little creative trimming of the GEM chassis, made for a perfect fit. All I had to route into the house was Ethernet and a CAT5 cable for possible future use of the 8-device onewire temperature feature of the GEM. The GEM also has pulse counter inputs for potential water or gas consumption measurement. I am not going to use those features at this time.

    You can click on any of the images below to see a full-size version.


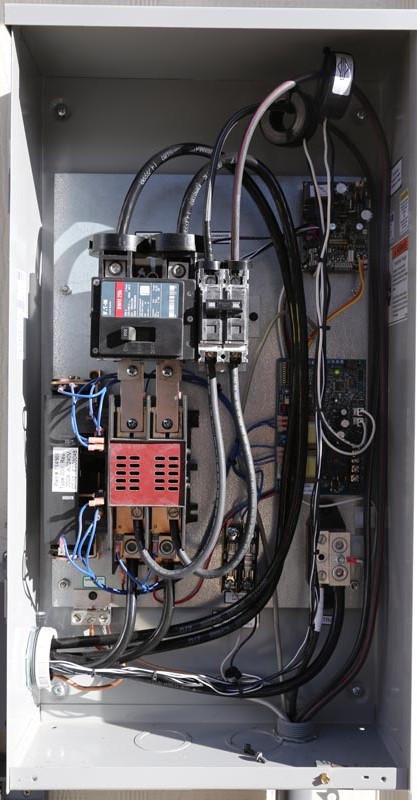
    The generator transfer panel has three sets of CTs. One for the utility input, another for the generator’s output and a third for the supply to the generator. The supply to the generator powers the controls, battery charger, battery and engine heaters.


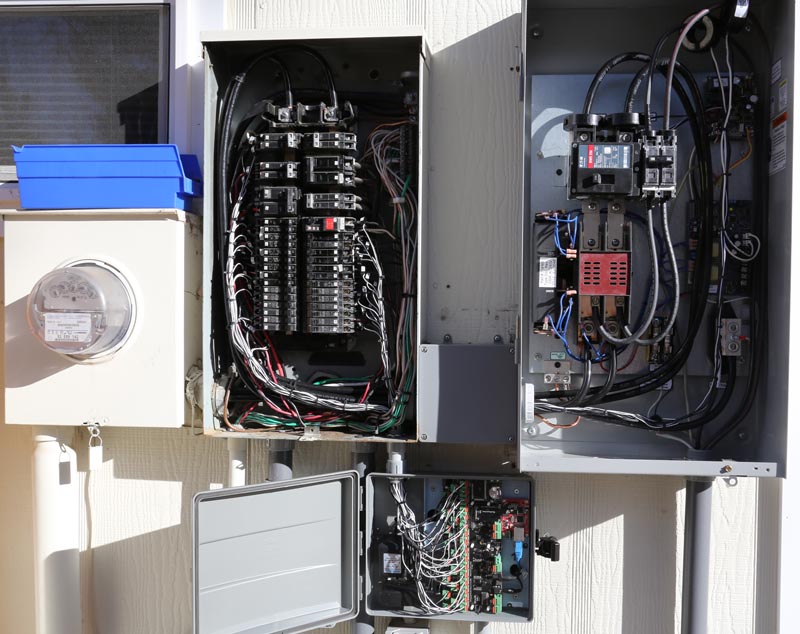
    The breaker panel had the rest


    Here is the GEM in place, there is a OneWire temperature probe inside the housing to monitor the internal temperature.


    And the whole picture


    Here are some screenshots of UltraJones’ excellent plug-in “UltraECM3” showing the graphing and load display pages.
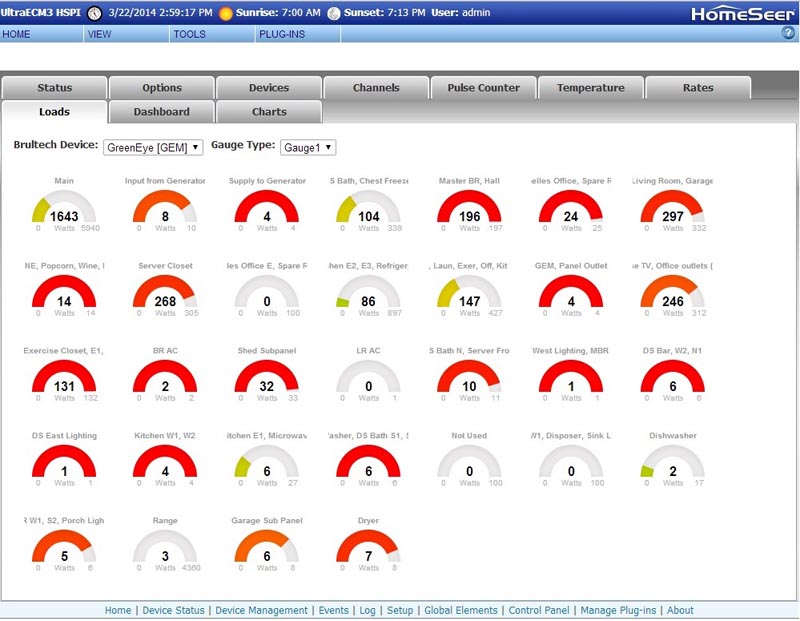
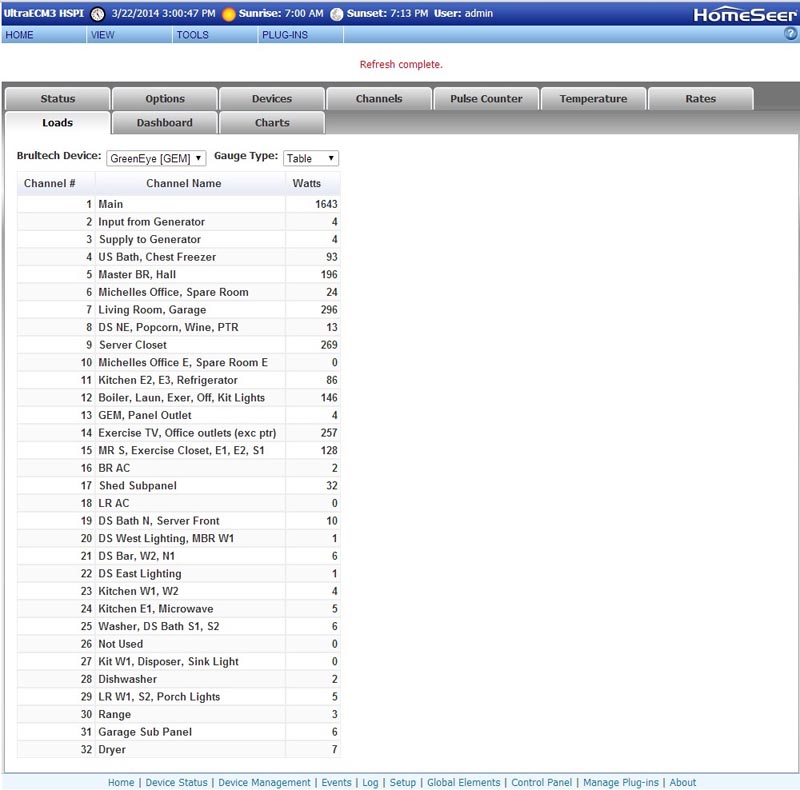
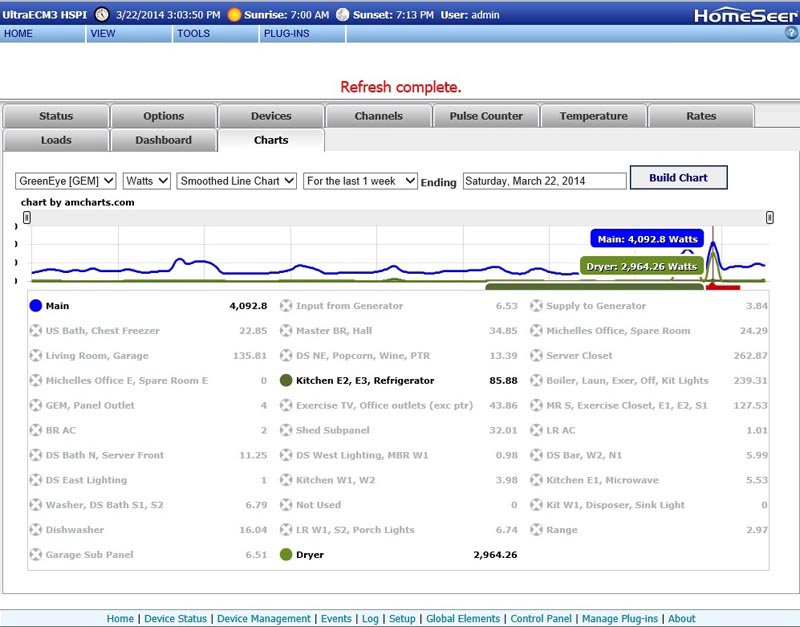


    Note that these screenshots were taken today with the family upstairs watching TV (circuit 7) and me down at my large workstation (circuit 14) writing this document. You can also see that the HTPC in the master bedroom (circuit 5) is awake and active with me performing system and software updates. The table shows the added activity on all of those circuits. When all the equipment is off or asleep those circuits are generally under 20-watts. Only with the detail provided by the GEM can I see that kind of detail.

    This took care of February


    More to come….
    Last edited by randy; November 18, 2014, 11:25 AM.
    HS4 Pro, 4.2.19.16 Windows 10 pro, Supermicro LP Xeon

    #2
    Very nice Randy!

    Well actually better than just very nice!
    - Pete

    Auto mator
    Homeseer 3 Pro - 3.0.0.548 (Linux) - Ubuntu 18.04/W7e 64 bit Intel Haswell CPU 16Gb
    Homeseer Zee2 (Lite) - 3.0.0.548 (Linux) - Ubuntu 18.04/W7e - CherryTrail x5-Z8350 BeeLink 4Gb BT3 Pro
    HS4 Lite - Ubuntu 22.04 / Lenovo Tiny M900 / 32Gb Ram

    HS4 Pro - V4.1.18.1 - Ubuntu 22.04 / Lenova Tiny M900 / 32Gb Ram
    HSTouch on Intel tabletop tablets (Jogglers) - Asus AIO - Windows 11

    X10, UPB, Zigbee, ZWave and Wifi MQTT automation-Tasmota-Espurna. OmniPro 2, Russound zoned audio, Alexa, Cheaper RFID, W800 and Home Assistant

    Comment


      #3
      PART 2:

      The next challenge was our hydronic system. While it is a very efficient boiler for its age, there were areas with room for improvement. We currently have eight zones of heat and a ninth zone for DHW (Domestic Hot Water). The hot water is a 30 gallon tank heated indirectly buy the boiler. We have a mid-sized home and the boiler is 100,000 BTUH input. Our house was originally all electric, I converted to the hydronic system in 1998 as a retrofit. The sleeping areas of our house are cantilevered from the basement foundation by about 24-inches. One of the problems due to the retrofit is the exposure of hydronic lines to lower temperatures where they are run in the cantilevered portions of the house. We also heat our enclosed back porch, but the piping for that zone has to go through the garage, also exposing it to temperatures well below freezing. The house is insulated well enough that when the heat sets back at night it might be several hours before there is a call for heat in those 4 zones with vulnerable piping. When temperatures are below about 10 degrees it is possible for the hydronic lines to freeze in those zones. I cured that problem about 10 years ago with some Honeywell temperature controllers that monitor the four zoned return lines at points where they are most exposed to cold. These controls “bump” the control valves for those zones when the temperature measurement falls below 40-degrees. The down side is that increases the number of short cycles the boiler runs over night. A short cycle wastes gas and increases wear and tear on the boiler.

      We also had thermostats on every zone that had to be programmed for setbacks individually. A change of work schedule or vacation meant having to go to all eight and change them. Manually adjusted setbacks also do not take into account the outside temperature so it is possible the house begins heating too early or too late depending on the outside temperature. We really needed to bring all of this together.

      We had a number of goals in this phase
      • Protect the pipes form freezing
      • Reduce short cycles of the boiler
      • Unify the programming of all zones in the house
      • Easily accommodate changes in work/home schedules, outside temperature and occupancy
      • Have a failsafe fallback in the event of a HA server or associated controls failure


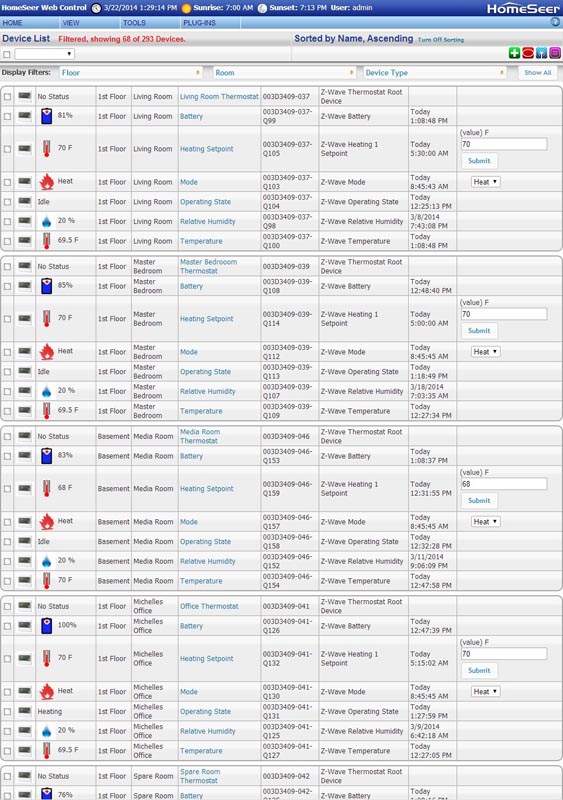
      The first step was to replace all of our thermostats with 2Gig CT100 devices. These are Z-Wave thermostats that are powered by the 24-volt system power with battery back-up. They are heating and cooling devices, but we only use them for heat. Since they are powered, they are active members of the Z-Wave mesh and most of the child nodes provide instant update. The humidity, fan state and operating state require polling for updates. Set points and mode provide instant update. I poll each thermostat on a 20-minute schedule, but the operating state on a much shorter schedule. Operating state tells me whether or not the thermostat is calling for heat.

      Here are the thermostats represented in HS3

      You can click on this image to see a full-size version.


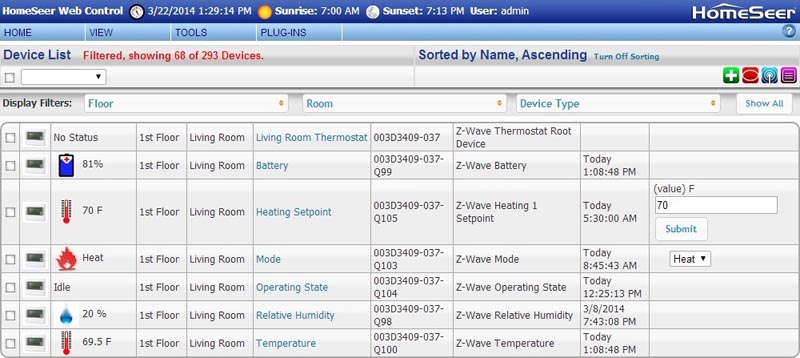
      I have hidden the child nodes we don’t care about

      You can click on this image to see a full-size version.


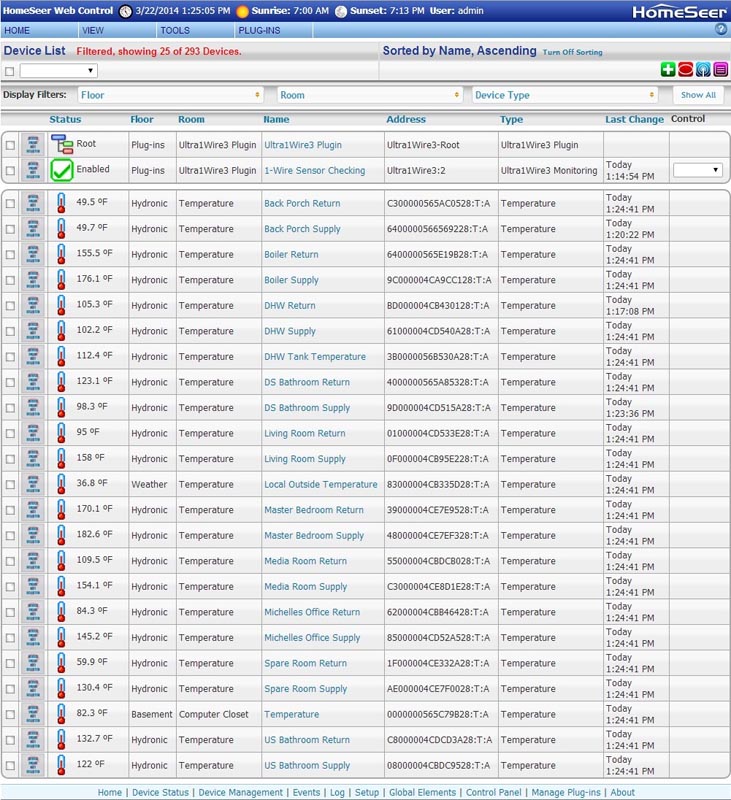
      The next step was temperature measurements of critical points in the system. I elected to measure supply and return temperatures of all nine zones, plus supply and return temperatures at the boiler, DHW tank temperature and outside temperature. I decided to use 22 OneWire devices for this, using another excellent plug-in from UltraJones – “Ultra1Wire3”. To provide the data from the 22 DS18B20 probes to the plug-in I opted for the EDS OW-Server Ethernet. I bought the probes on eBay from a Chinese seller. They are enclosed in a waterproof stainless steel sleeve with a 1-meter pigtail on each.

      The OneWire temperature monitoring

      You can click on this image to see a full-size version.


      They were $1.89 each (shipped) from China and arrived within about 7 business days. To me these are a lot cleaner and easier to deal with than trying to mount and wire the discreet devices. Since they are in a rugged stainless sleeve, I simply used a hose clamp to mount them to the copper pipes at the proper places. I placed a dollop of silicon heat transfer compound on each device, but that is likely unnecessary due to the tight contact. So now I have temperatures at all of the crucial points, reporting back to HomeSeer. At the same time as I installed the temperature probes, I rewired each zone such that I could read each thermostat's control line to see if it was calling for heat. The thermostat still directly controls the actuator's motor, but bringing this line low will also activate the actuator remotely. I also broke out the end switch on each actuator to its own line back to the “control room” So each zone has a line back to the server closet for valve status (low when open) and from the actuator control (low when active). While this level of control was only needed on 4 zones, I made a decision to treat each zone identically in case I decided to control each zone more directly from the HA server.

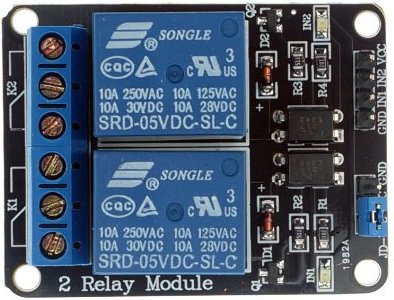
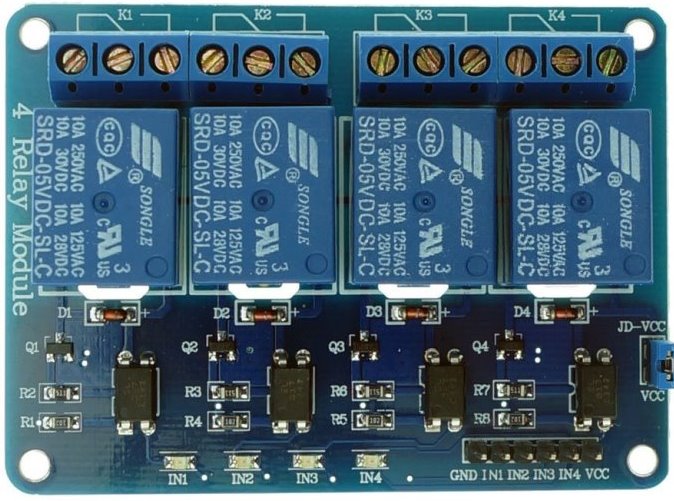
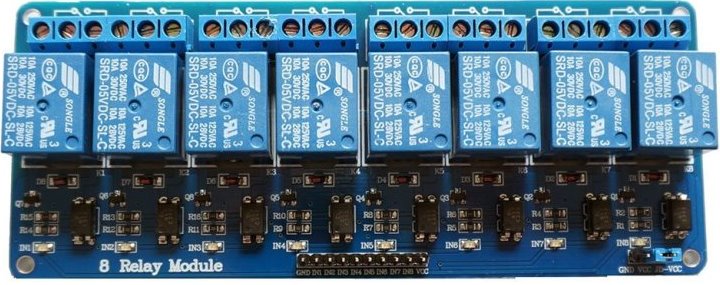
      For the ability to revert to a fallback control each of the nine actuator end switches control a relay. I used the little two, four and eight relay packages used with Arduino or Raspberry Pi devices. They are powered by 5-volts, optically coupled and active when low. When a zone valve opens, at the end of its travel it closes a micro switch, which in turn activates a relay. The outputs of these relays are wired in parallel so that they can be used to turn on the boiler if the HA system is inoperative. Additionally if none of the relays are on the Boiler cannot run in case the HA system hangs in any kind of error state. We don’t want the boiler running with all of the valves closed.


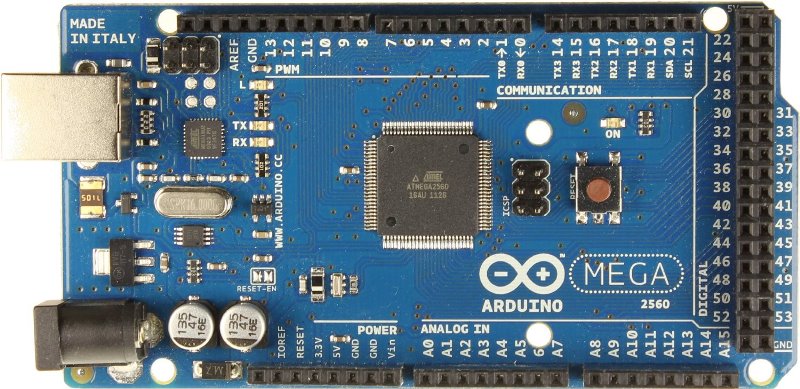
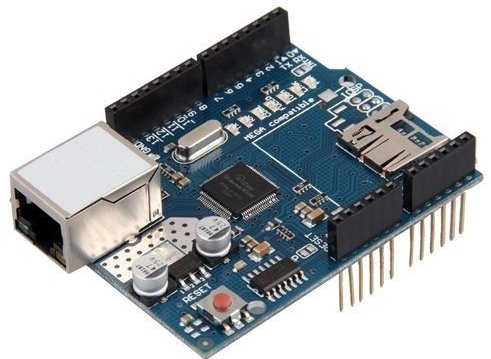
      The next step is to be able to read the status of the zone switches and to be able to control the zone actuators remotely. Along comes another excellent plug-in from “enigmatheatre”, an Arduino plug-in. This plug-in supports digital inputs, outputs, PWM< outputs and OneWire devices. Since I had already chosen a OneWire solution, all I needed were inputs and outputs. My server closet and the boiler closet are very close to one another, but I opted for two Arduino boards – one in the server closet and a second in the boiler closet. The six house zones are controlled in the server closet and the two bathrooms and DHW are in the boiler closet. I used Ethernet shields for the Arduino boards for the same reason I connect my Z-Troller through an Ethernet to serial device – it allows me to use a virtual machine on my Windows Server Essentials Media server in the event there is a failure of my primary HA server. All I do is shut down the HA server and set the VM to the same IP address as the HA server and the system is up on a backup server. The VM is loaded with the entire HS3 system from the primary server each night. I elected to use Arduino Mega boards since I wanted six inputs and outputs from each board. The UNO can’t do that when the Ethernet Shield is in place.

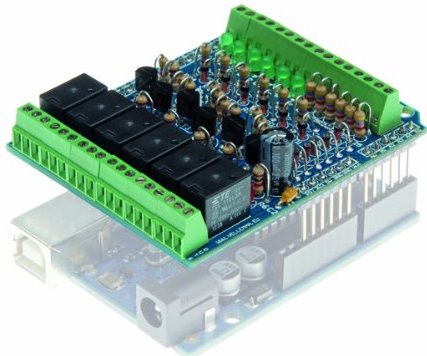
      I also opted to use a Vellman I/O shield so that I had a clean method of getting inputs to the Arduino and outputs from the Arduino that gave indication of the status. There are six 1-amp rated relays plus LEDs indicating status of inputs and outputs.

      Arduino Mega


      Ethernet Shield


      Velleman Shield


      More to come, bringing it all together….
      Last edited by randy; March 22, 2014, 11:43 PM.
      HS4 Pro, 4.2.19.16 Windows 10 pro, Supermicro LP Xeon

      Comment


        #4
        PART 3:

        The next step was to connect all of the zone switches and actuators to the Arduino boards and relay boards. In the server closet there is an 8-relay board with 6 in use. Each relay is tied to one of the house zone valve end switches. All of the outputs of these relays are wired in parallel as described in part 2. The inputs controlling these relays are also wired to the six inputs on the Arduino I/O shield. The six outputs on the I/O shield are wired to the zone actuator control motors (also connected to the thermostat control wire at each zone. These outputs can actuate the zone valves even when the thermostat may not be demanding heat. This will be used for pipe freeze protection in the four critical zones. The Arduino is powered by a 12-volt switching supply and the relay board is powered by a 5V DC-DC converter supplied by the 12-volt supply. I prefer discrete power supplies to “wall warts”. Additionally the dual power supplies isolate the Arduino from any spikes generated by the relay boards. I did see a couple of random false triggers on inputs when I was breadboarding the system with wall warts.

        Here is the installation in the server closet. I am still in the process of tidying it up, but it is already fairly clean. You can see the EDS OW-Server at the top left. Below it is the first Arduino stack. Since the Arduino I/O shield is designed for the UNO and would not allow all six inputs and outputs along with an Ethernet shield, I routed the I/O pins to the back bank of connections of the MEGA. Below the Arduino is the 8-relay bank. Below the EtherRain 8 controller is the 12-volt power supply and below that is the 5V DC-DC converter. There are three wires from this board to the boiler closet controls. Common, 24V and the boiler on hardwire from the relays. The 24-volts from the boiler closet is also used to power the EtherRain 8, eliminating an additional transformer. The only other connection to the boiler closet is an Ethernet cable for its Arduino.

        You can click on this image to see a full-size version.


        Our boiler is a simple Vailant natural gas fired boiler with a Honeywell aqua stat controlling the temperature. When there is demand from any of the zones, triggered by the closure of a zone valve end switch a relay in the aqua stat starts the circulator and fires the burner. A high limit thermostat lets the burner run as long as there is demand, until the water temperature reaches 200F. The low trip on this limit switch is 15 degrees lower than the high set point or 185-degrees. What this means in a conventional system is that the burner always fires if the water temperature is below 185 degrees. One decision I made when I was mapping this out was to be able to separately control the circulator and burner. To that end on the Arduino I/O shield in the boiler closet controls the remaining 3 zone (Bathrooms and DHW), the circulator and the burner for a total of 5 outputs. I used a small 2-relay board to control the circulator and burner controls, fearing that the tiny relays on the I/O shield might be a little inadequate. I used three relays on a 4-relay board to read the remaining three zone motor end switches, also coupling those to three inputs on the Arduino. As in the other room the outputs of the relays on the relay board are wired in parallel to control the boiler.

        This installation is still in need of some final cleanup but below is a picture. There is an Arduino with Ethernet shield and an I/O shield, the 2-relay board controlling the circulator and burner and the 4-relay board for zone switches. The Honeywell temperature controller is for failsafe and redundant control of DHW, again in case of HA failure, it can fall over to that control. It also provides a failsafe control of the DHW zone valve in case of over temperature. There are the two power supplies and the 24-volt transformer. Below that is the failover relay allowing the system to operate manually in case of HA failure. I have not completely decided on the best method to control this failover, all that is required is a single pole double throw device to switch the outputs form the relay banks from HA to this relays coil. It is a 3PDT relay for circulator and burner. At a glance I can tell that there is demand from the upstairs bathroom and that valve is open (the green LED on the I/O shield and the RED LED on the 4-relay board. I can guess that it just happened because the circulator is on but the burner is not (the red LED on the I/O shield and the red LED at the top relay of the 2-relay board).


        You can click on this image to see a full-size version.


        Then we have the plug-in from enigmatheatre for the Arduino boards. As you can see below, it creates devices for each input and output along with corresponding triggers in the Event manager. I think it makes sense, but there are 9 valves representing the zones, 9 actuator controls for the zones and devices for circulator, burner and three display outputs for a status panel upstairs. The status panel tells us at a glance whether we are heating the house, hot water or if the system is on. It is necessary for WAF as she is used to it being there for 20 years. If she sees the heat is on, she is less inclined to feel cold This control board also has a push button to toggle "all heat on" or "all heat off". If we open up the house on a cool day, one press kills all heat. In the event we forget to turn the heat back on, a low temp threshold on any thermostat, will turn it back on. This button triggers an input on the boiler Arduino. A 1 uf capacitor across this input eliminated sporadic false triggers.

        You can click on this image to see a full-size version.


        The last goal was programming, all accomplished with HS3 events and no scripting. While I intend to progress to scripting at some point, I felt HS3 was well enough designed to accomplish everything I needed through events. As it stands it is working perfectly and completely event driven. While I obviously cannot go into all of the events and logic that went into the control here are some of the key features.
        • The circulator and burner are controlled separately.
        • The burner timing is controlled by logic determined by the boiler temperature at the time of demand as well as the type of demand. The burner can come on instantly or be delayed by as much as six minutes.
        • The freeze protection is no longer random. If any of the four zones is cold, it goes through all four in round robin fashion, only using the circulator, unless the boiler is below a threshold temperature. This stops short cycles of the boiler from that system.
        • Demand from a single zone may be delayed for a short period unless/until there is demand from a second zone.
        • Zone thermostats have their modes and set points controlled by a schedule set in HomeSeer, making it very easy to set temperatures or timing all at once.
        • DHW is also on a setback schedule so that it is kept at peak temperatures only during times of peak usage. The rest of the time (during sleep or work hours) it is idle unless/until it falls below 90-degrees. So far the Boiler now gets DHW demand only twice a day. The old system would run 5-7 times a day, even in the summer.
        • Outside temperatures are figured into the “wake-up” schedules, allowing only enough time for the temperatures to reach goal by the appropriate time. The zones also have staggered “wake-up” schedules, first heating sleeping areas, followed by bathrooms and then living areas. Watching the HS logs allowed me to fine tune this timing.


        So far this is all working splendidly. The boiler cycles notably less frequently. It will likely be next year before I can tell if this will significantly reduce our NG consumption, but the house “feels” better.

        Greig (enigmatheatre) has been very helpful in solving a few minor problems in his plug-in which is still in beta development. You can read about this plug-in here.

        Many thanks to UltraJones for his two plug-ins UltraECM3 and Ultra1Wire3.
        Last edited by randy; February 9, 2015, 02:44 PM.
        HS4 Pro, 4.2.19.16 Windows 10 pro, Supermicro LP Xeon

        Comment


          #5
          I mentioned servers in my first post and I have received a couple of emails asking about them. One noticed that about 270-watts was consumed in the server closet.

          They are all SuperMicro servers and all have remote management. HS3 is running on a small 1u chassis with a single SSD and a Xeon E3-1230 processor and 8GB of RAM. It runs Windows 7. It is set to startup and log-in to a user account without interaction. HS3 is on delayed startup of about 30 seconds to give the machine time for a stable network connection and reliable connection to the IP2SL Ethernet to serial device. It has a fairly small energy footprint of less than 40-watts.

          The second server is 2U chassis with an SSD system drive and 8 4TB data drives. Also a Zeon, but an E3-1270 with 32gb of RAM. It runs Server Essentials 2012r2 and serves up media (Blu-ray ISO rips, DVD folder rips and music. It also performs nightly backup of all of our PCs, laptops, HTPCs and the HA server. It also hosts several Hyper-v VMs. An XP and a Windows 8.1 platform for testing. A Windows 7 VM as a backup to the HS3 server should the primary fail. I tried running HS3 on a VM full-time, but it was a little slow rendering pages as well as starting and stopping. It functions fine, but I prefer the snappier response of a physical machine. Down the road, if I am not making as many changes to HS3 I may move it to a VM permanently. The last VM is another Windows 7 machine running my Vivotek ST7501 surveillance server. It supports 13 cameras and I am quite happy with its full-time high resolution recording and the iPhone iPad apps they provide. The Vivotek software stopped playing well with HS3 some time in February, so it has to reside on a different machine. A VM is plenty fast for that software. I store about 8 days of 8FPS video from every camera - they are all megapixel IP cameras. This machine is a little hungrier at about 75-watts.

          The biggest full-time power consumer in the server closet is a 48-port POE managed switch. It powers the 13 cameras and the IP2SL Ethernet to serial adaptor for the Z-Troller. It runs just over 135-watts. the remainder is the controllers, UPS (X2) and other small equipment in that closet.

          There is a third server that is run on demand with massive storage for Blu-ray and DVD rips. It has over 95TB of storage and is where we archive all of our DVD and Blu-ray backups.
          Last edited by randy; March 22, 2014, 11:08 PM.
          HS4 Pro, 4.2.19.16 Windows 10 pro, Supermicro LP Xeon

          Comment


            #6
            Very very nice setup, I like the per circuit monitoring. I did start to drive myself a bit crazy monitoring my power though trying to squeeze out every bit of efficiency from it I could before I settled. I too used the Chinese DS18B20 probes in some Bluetooth temperature transmitters I built, I am a bit skeptical whether or not they are true devices or some sort of clones but they have stood me well for over a year now.

            Keep up the good work...

            Comment


              #7
              Wow! I haven't had time to be on here in a while, but ran across your post and couldn't resist. BIG Thanks for sharing your setup, detailed write up and and so many pics. I'd been on the fence about going down the brultech path, but having seen your set up I think it would very useful and not too difficult to setup. The pictures really help. Thanks again for taking the time to do all this for the community!
              Tom
              baby steps...starting again with HS3
              HS3Pro: Z-NET & 80 Z wave Devices,
              HSTouch: 4 Joggler (Android Kitkat), 2 iPhone, 3 iPads
              Whole House Audio: 5 SqueezePlay Jogglers w Bose Speakers
              In The Works: 10 Cameras Geovision, new Adecmo/Envisalink Alarm, Arduinos
              System: XP on Fanless Mini-ITX w/ SSD

              Comment


                #8
                Originally posted by TomTom View Post
                Wow! I haven't had time to be on here in a while, but ran across your post and couldn't resist. BIG Thanks for sharing your setup, detailed write up and and so many pics. I'd been on the fence about going down the brultech path, but having seen your set up I think it would very useful and not too difficult to setup. The pictures really help. Thanks again for taking the time to do all this for the community!
                You're welcome. I have found that a detailed description of a project can be the genesis of new ideas for others. I know that I learn a lot by looking at how other people approach an installation. Hopefully it will also bring ideas for improvement.
                HS4 Pro, 4.2.19.16 Windows 10 pro, Supermicro LP Xeon

                Comment


                  #9
                  Great job and thanks for the great write-up. I have a Current Cost monitor and in hind-sight I wish I would have gone with the Brultech as the CC limits you to much fewer sensors.

                  Cheers
                  Al
                  HS 4.2.8.0: 2134 Devices 1252 Events
                  Z-Wave 3.0.10.0: 133 Nodes on one Z-Net

                  Comment


                    #10
                    Id like to second some of the comments. Thanks for putting up such an informative writeup on how you have set your system up and what it can do. I think it is especially impressive how much you have been able to do with the Arduino's
                    HS3 PRO, Win10, WeatherXML, HSTouch, Pushover, UltraGCIR, Heaps of Jon00 Plugins, Just sold and about to move so very slim system.

                    Facebook | Twitter | Flickr | Google+ | Website | YouTube

                    Comment


                      #11
                      Thanks for the write up, this is great information.

                      I am working on something similar to what you have. I have the brultech modules and was thinking of geting the plugin to monitor the system. I have an all electric house and want to be able to control my water heater and A/C units to reduce electric bills.

                      Can the ultrajones plugins wattage readings be used to trigger events. I would like to configure homeseer to monitor the power usage and if the house power usage is above a certain value, prevent the water heater or other devices from turning on (via High voltage power switches).

                      Comment


                        #12
                        Originally posted by ehinkle27 View Post
                        Thanks for the write up, this is great information.

                        I am working on something similar to what you have. I have the brultech modules and was thinking of geting the plugin to monitor the system. I have an all electric house and want to be able to control my water heater and A/C units to reduce electric bills.

                        Can the ultrajones plugins wattage readings be used to trigger events. I would like to configure homeseer to monitor the power usage and if the house power usage is above a certain value, prevent the water heater or other devices from turning on (via High voltage power switches).
                        Yes, you can use any of the devices from the plug-in as event triggers or conditions. I use the power consumed by the washing machine and dryer to trigger events that let my wife know when each machine has finished its cycle. The resolution of the Brultech is so good that here is no limit to how creative you can be creating events. You could look at the circuit to your refrigerator and create an alert if it has not cycled on within a specific time frame. You can compare your overall consumption with time specific energy cost tiers. Where I live there is one tier, we pay one price for the first 500kwh in a month and a higher price for usage above 500kwh. There isn't much that can be done since we average above 1000kwh per month.
                        HS4 Pro, 4.2.19.16 Windows 10 pro, Supermicro LP Xeon

                        Comment


                          #13
                          That is what I am trying to do. We have a 9am -9pm plan where electricity cost more during that time and more depending on the energy demand. That is why I want to be able to control what is coming on during those times to reduce demand.

                          Sent from my LG-V510 using Tapatalk

                          Comment


                            #14
                            Originally posted by ehinkle27 View Post
                            That is what I am trying to do. We have a 9am -9pm plan where electricity cost more during that time and more depending on the energy demand. That is why I want to be able to control what is coming on during those times to reduce demand.

                            Sent from my LG-V510 using Tapatalk
                            The Brultech will give you the granularity to chase down usage to a circuit level. Your best results will be to schedule high usage devices like water heater, hot tub, etc. Those devices can be turned off during the higher cost periods. The clothes dryer is a little more problematic because all you can do is suggest that loads be run after 9. If you try to control it, you may be in for some domestic disturbance
                            HS4 Pro, 4.2.19.16 Windows 10 pro, Supermicro LP Xeon

                            Comment


                              #15
                              rprade, thanks for the great write-up, I wonder if you could post some pics of your temperature sensors on the pipes and a link to where you bought them from.

                              We have a similar setup to yours, 11 zones of radiant heat and a boiler. We have used the Brultech devices and ultrajones plugins since 2010 and our energy cost savings over that period is in the thousands of $$. Here in CA our rates are sky high, PG&E offers several plans, we are on a "predictable" 5-tier plan. By tracking the current tier we can optimize our energy cost both automatically and by some discretion on usage of high power devices.

                              It is amazing how much energy cost can be optimized with HA and simple monitoring, unfortunately it is not promoted to the masses as much as the "alternatives", like leased solar panels. These are pushed at people in places like Home Depot, but when I really looked into a contract (reading all the fine print), I found that it will result in the higher total cost over the 20 year deal period, besides the extra lien on the house and many other issues in exchange for the initial $15 savings from the current monthly bill.

                              Comment

                              Working...
                              X